Showing posts with label recycle and repurpose. Show all posts

Wednesday, January 30, 2013

Dolman Sweater to Eternity Scarf & Beannie Hat

Going through my closet the other day I pulled out an adorable sweater I had bought on sale last year.  It was one of those, "It's so cute!  It's so stylish!" moments when what seems to work in the dressing room never looks quite the same at home.  Its horizontal stripes, and baggy shape weren't exactly figure flattering.  The wide neckline kept slipping off my shoulder and I just didn't feel comfortable revealing a bra strap to the world.  I tried it on the other day to wear to church and my 12 year old plainly stated, "Uh.  Mommy.  NO."  Message received and understood!

 
But the stripes!  The cozy, stretchy knit!  I was having a hard time parting with it, so I decided I would upcycle it into something.  I had previously upcyled a wool sweater into slippers and made the sleeves into a pair of slipper socks for my daughter, but this sweater was a synthetic knit, and wouldn't shrink  and felt.  I thought the stripes would make a lovely scarf, so away I googled.  Here is a helpful tutorial on how to turn a sweater into an eternity/circle scarf.

Here's what I did.

1.  Lay out sweater.


2.  Cut a straight line through both layers of material.  Turning the bottom part of the sweater into a circle scarf was the simplest thing since the edges naturally rolled under and didn't need hemming.  In hindsight, I wish I would have cut the line up higher and made a wider scarf.  I didn't realize it would stretch so much and become so narrow.   But it was just the right size for my daughter!


3.  The dolman sleeves were wide enough to make a hat for my daughter.  For the beannie hat I simply cut off the cuff, and then cut the sleeve away from the body.  Then I stretched it over my daughter's head, trimmed it to the right size, flipped it inside out, stitched together the top opening and gave it back to my daughter.  
If your sweater sleeves aren't wide enough to make a beanie, then you can use other parts of the sweater, as in this tutorial.


It made me smile to see my daughter go out the door this morning with her new accessories.  I don't have to be wearing the sweater to enjoy its fun and cheerful fabric on a grey, rainy January day.


The whole project took 15 minutes tops.  Blogging about it has taken longer!

This would be a great project for a sweater you love that no longer fits, or has a stain somewhere.  Happy sweater hunting!


Friday, March 2, 2012

Felted Wool Sweater Slippers


One of the best ways to keep your heating bill down is simply by wearing slippers.  I mean think about it....when your feet are cold you just feel cold all over.  I've been pretty blessed with a mother-in-law who knits these kind for our whole family.  It's a mark of being in our family if you get a pair of these slipped in with a Christmas or birthday present!  And you might even find some money tucked inside.  :-)


However, I tend to wear mine out pretty quickly with washing them frequently and snagging them on those little doorway dividers.

I had been hanging onto one of my husband's old wool sweaters for a while with the idea that I would make something from it.  Thanks to this awesome tutorial, on how to upcycle a sweater into slippers, I decided to make my own.  Thank you to Vanessa, the blogger behind Homemade Holiday Gifts.

I ran the sweater through a hot water wash several times to get it felted nice and tight.  The kids thought it was pretty hilarious seeing a sweater that once fit daddy now in their size.  I traced the outline of my feet just the way the tutorial suggested and created the pattern.  Since I wanted my slippers to be extra warm I cut out two layers of fabric for each of the soles and sewed them together for that extra layer of insulation and comfort.  It seems like I had one sick kid after another this winter in my house, so there were lots of "in days" to work on something like this.

Anyway, I won't give you every last detail, since it's described so nicely in the tutorial.  I used the neck band of the sweater to make a nice, tight cuff and then added a couple of felt flowers with a button just for the girly factor!


Voila!

They are soooo warm and fuzzy.....and way cheaper than buying a designer pair.
Free and upcycled!  Two of my favourite words!

I also made a pair of felted wool slipper socks for my 13 yr old out of the arms.  Stay tuned for that post another time...

Thursday, April 21, 2011

Upcycled Cardboard Tube Flowers

I wanted to make a springy/easter banner or garland with my girls, and I saw a picture somewhere (I wish I could remember where the link was since I got the idea from there!) of an adorable garland made of recycled toilet paper or paper towel tubes.  Apparantly lots of people have done this, because it was pretty easy to find a how to on the web - check it out! 

Cardboard Tube Flowers

Here's an example of a really crazy, cool one! 

We had a freak hailstorm one afternoon last week, so it was the perfect time for the girls and I to do an indoor activity.  This is a great craft for all ages - my 13 year old enjoyed mixing up all the craft paint colours, and my 4 year old sat for in a chair for at least half an hour carefully painting her toilet paper petals with a little paintbrush.  After they were painted, we let them dry overnight, pinched them & glued them into five petal flower shapes, poked a hole in the top petal, and strung them on a piece of ribbon.  Oh yes, we also painted a sheet of corrugated cardboard, cut it into circles, and glued them onto the flower for the centre.


It was so stinkin' easy, fun, and FREE!  And with the bizarre temperamental weather we've had lately it's nice to have a few flowers to brighten the doorway.

Happy Easter!

Linked to Thrifty Thursday
Photobucket

Tuesday, April 12, 2011

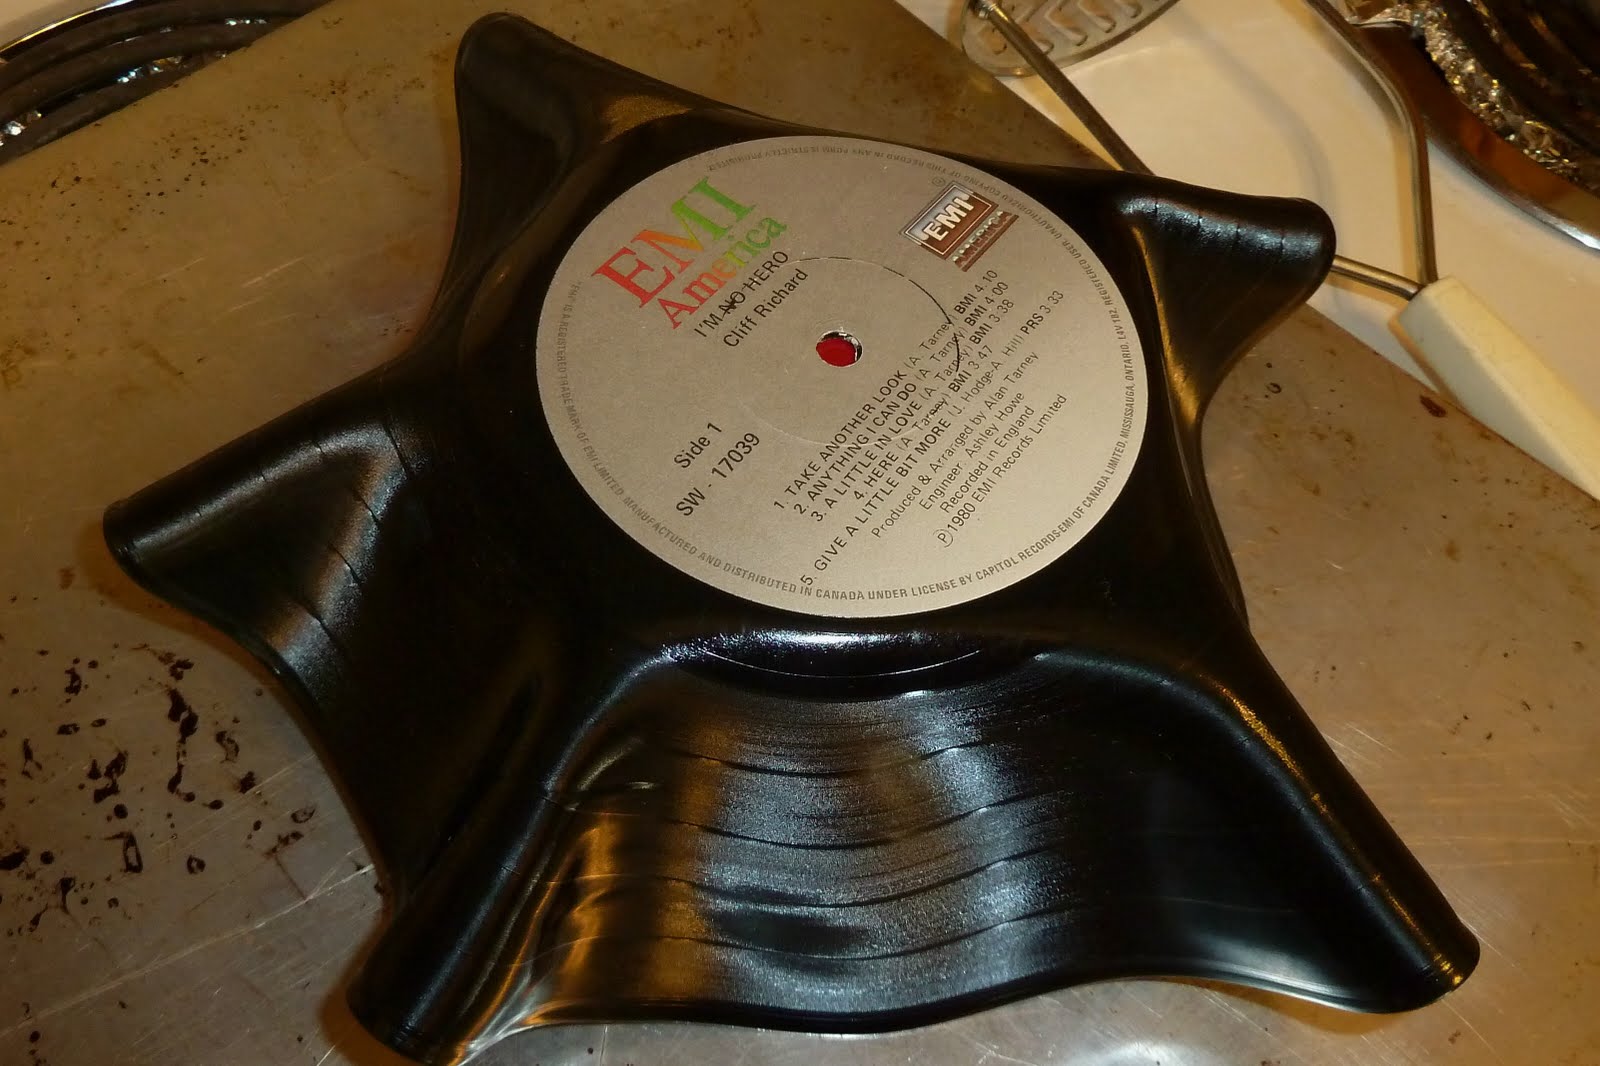
Upcycled Vinyl Records into Funky Bowls

My 12 year old was given a great book for Christmas called, "DIY Divas".  It's got tons of fun, simple crafts, jewlery making, sewing, beauty products and decorating ideas for preteen girls.  She loves it!

DIY Girl

After school today she made this simple craft in about half an hour - records into funky bowls!


Find a couple of old vinyl records.  Garage sales, thrift stores, your parent's or grandparent's basement....


Place an oven proof bowl on a cookie sheet and centre record on top of bowl.


 With oven at 200 F watch it carefully till the sides begin to droop over side of bowl.  Remove from oven.


Working quickly use oven mitts to fold and press the record over the bowl shape.


It hardens pretty quickly.  If you didn't get the shape you desire you can heat it some more and try again.


She tried a couple and here's the result!  Pretty funky!  I have no idea what she's going to do with them - maybe put chips in them for her upcoming b-day party.

It's great to find crafts that aren't too baby-ish or even girly for the preteens or teens in your life.

Linked to:
Today's Creative Blog - Get Your Craft On
Tip Junkie handmade projects
Anything Related


Photobucket

Thursday, March 31, 2011

Daily Declutter Challenge #42 - Thinning out the Bookshelf

OK, so I'll be honest - I haven't been decluttering EVERY day now, but it's a good thing because spring has tentatively arrived on the West Coast.

However, a viral croup has also arrived for my little one, so I had to cancel appointments yesterday & today (renal for her, orthodontics for her sister) and spend lots of time inside, giving nebulizing treatments, watching shows, and generally laying low with Little Miss Wheezy.

Lots of time inside means that there was bound to be a Declutter waiting for me....


Oh, it's hard to declutter books, isn't it?  But when books are starting to get stacked in front of books then either you get another bookshelf (no thanks - there's really not much room for another piece of furniture!) or downsize.

I realized that just because I LIKED that book, and enjoyed reading it in the past, it didn't mean I had to hang on to it.  I came at it with the attitude that there were plenty of other great books out there waiting to be discovered!  And I really like to utilize the local library - they've got the storage space for waaaay more books than I do!

Sometimes decluttering can get pretty messy...


Especially cluttered was the top of the bookshelf - all the cards from my kids and husband were jammed into a couple boxes and were starting to pile up on top.

I found a sturdy, cardboard box that fit these papers and cards nicely, but it wasn't that pretty.

I had some pretty paper left over from Bulliten Board Makeover so I decided to give the box a quick makeover.


Keepin' it real....I didn't have enough paper to cover the whole box.  Ah, well - no one will see the backside!


I managed to clear an entire shelf of books, so I was able to move the bins of cards onto their very own spot, and placed my sewing kit on the top shelf, away from little hands that tend to get into it!


P.S.  The little Raggedy Anne is a piggy bank I received from my grandparents when I was 3 years old, and the "well loved" Hollie Hobby Doll was my first dolly from my mom.  They are very sweet up there!

Wednesday, March 23, 2011

I Tried It - Homemade Orange Oil

A while back we had a box of big, juicy oranges that only took only about a week to go through. I remembered that orange oil comes from the peel, and it makes an amazing chemical-free household cleaning agent. I searched around, and it seemed most of the recipes online suggested this method.


1. Lay out your orange peels on a paper towel. Allow them to dry out until they are hard. This usually takes one or two days, depending on the humidity in your house. This process goes faster if you tear the orange peels into smaller one-inch pieces.


2.  Place the orange peels into a food processor with a sharp blade. Grind the peels to a coarse consistency. When they reach a course consistency, stop processing because over-processing can cause loss of oils from the peel. Place the ground peels into a clean glass mason jar with a tight fitting lid.

3.  Warm the alcohol. Place the bottle of vodka into a bowl filled with hot tap water. You want the vodka to be warm but not hot. Pour the vodka into the jar until it completely covers the orange peel.


4.  Screw on the lid and shake the jar. Shake it vigorously over a period of several minutes. Do this several times a day for at least two or three days. The more you shake it and the longer you leave the peels in the vodka, the more oil you will get.


This is what it looked like after a couple days.  Those orange peels soaked up most of the liquid.


5.  Strain the peels into a shallow dish using a strainer or better yet a coffee filter.


6.  Cover the dish with a kitchen towel. Be careful not to let the towel fall into the liquid. Let it sit for a few days: when the alcohol has evaporated, what remains will be orange oil.

Looks just like orange juice, doesn't it?  I wouldn't suggest drinking it though!
So.....I have a sneaky suspicion that this isn't quite right.  It doesn't seem to have a very "oily" feel to it. Hmmmmmm.  I tried using it as a 'de-gooper" like Goo Gone, but it didn't do much.  I'm sure I can use it as a fragrance in soaps, etc, but as far as it being a true essential oil, it seems to be missing the mark.

Plus, Vodka is expensive!  Man, I was shocked.  I think I'll just stick to buying orange oil from now on - in this case I'm leaving it to the experts.  Here's a few places to pick some up if you need any.


However, there are tons of other uses for orange peels!  I'm going to have to try these ones next time I get a case of oranges.
 - dried orange peels are flammable and smell great as kindling in the fireplace
  - A puree of orange peel and water spread around an outdoor barrier will prevent ants from crossing over.
  - Flies and mosquitoes will flee from an area with small piles of orange zest, so finely grate the rind and place it around your blanket at your next picnic.
 - Do you want cats to stop digging in your plants? Place dried peel around them. Cats hate the smell!
 - Orange peels are a great deodorizer. Put some at the bottom of your garbage cans.
- A piece of orange peel placed in a box of brown sugar will keep it from drying out.
- Use grated zest in baking.

My  homemade orange oil might not be as "pure" as a store bought essential oil, but I'm sure I can find some use for it.  And having the orange peels steeping in a mason jar over my kitchen sink was actually quite pretty.  Here's one more look!


Linked to:
giveaways

Thursday, March 10, 2011

Repurposed Key Necklace

Yesterday was a "non-daily declutter" day for me as it was packed full with speech therapy for my 4 yr old, a root canal (that took over 2 & 1/2 hours!) for my 12 yr old, and getting ready for a "Girl's Night" in the evening with a group of young women whom I have been mentoring since they were young teens. They're now in their early 20's, working, going to school, getting married, having babies....it's pretty amazing.

The day before the girl's night my husband did a little decluttering himself and got rid of a bunch of old keys from a key chain. He half jokingly. half mockingly handed them to me and said, "Do you want to repurpose these?" Har. Har. Sounded like a challenge to me, so I stuck them in my pocket and pondered it as I went about my day.

Now remember, I am trying to both learn how to declutter AND repurpose lately, so my rule is, if I don't know what I want to use it for RIGHT AWAY then I don't keep it. I don't have a basement, garage, or storage room and with six people living in a 1,400 square foot space, you can imagine NOT a lot of extra closet space.

But the phrase, "Key to my heart" popped into my head and it fit perfectly with what I was going to be sharing with my awesome young women the next evening. I could make a key necklaces for them as a reminder to guard their hearts!

I forgot to take a before, but you can picture just regular, goldish coloured keys.

STEP 1:
Spray painted the keys with some red spray paint I had at home. I gave each side a couple coats. I got impatient and didn't let one side dry thouroughly before I flipped them and did the other, so I ended up having to peel newspaper off the back of one side.

Keepin' it real....I did this on my kitchen table with the patio door open.  I didn't use enough newspaper on the table. Spray paint really.... ummmmm... sprays.

STEP 2:
Stick on heart shaped "bling"sticker that I picked up at Michael's.

STEP 3:
Thread with ribbon. I bought a spool of black ribbon from Michael's and my homestay student also gave me some soft lace ribbon she had in her craft stuff. Tie a knot around the loop in the key so that it hangs straight and then tie a knot at top.

Oooooo....I think I like this repurposing challenge!

Cost to me: About 50 cents per necklace.

Investing into the lives of young women: PRICELESS


Linking to:
Get Your Craft on @ Today's Creative Blog


Keeping It Simple

Monday, March 7, 2011

Fugly Pitcher Makeover

On a recent trip to Value Village with my mom, I picked up a really hideous looking pitcher and bowl set.

The picture doesn't even do justice to how putrid the colour scheme is.

My family thought I was insane.

But a a few coats of Heirloom White Spray paint, and a sunny Sunday afternoon later.....we have THIS!


My Mom was amazed...."How did you think of doing that?" she wondered.  I said, "There are millions of creative people out there who put their ideas on the internet for Clueless Crafters like me!"

Linking to these great inspirational parties!
Make the World Cuter Monday

The DIY Show Off


http://www.thethriftyhome.com
Domestically Speaking